Dein Warenkorb
Your cart is empty
Continue shopping
Drawer menu
Quick guide to hot wax (detailed below):
Waxing your chain on your road bike, gravel bike or everyday bike has many advantages.
Step 1: Clean and dry the chain
In order for the liquefied and hot wax to get onto and especially into the chain, the links must be thorough from the original greasing (oil) free.
This can be done by diluting it with nitro thinner in a mason jar.
One or more chains are shaken a few times until the nitro thinner remains clear.
Depending on the manufacturer, this may take a little longer. Usually 1-3 passes.
The nitro thinner can be easily reused afterwards if you run it through a filter (coffee filter).
Attention: This should only be done in the fresh air and ideally while wearing respiratory protection.
Important, no matter what your requirements are when growing, it is important that the chain is fat-free as possible becomes.
The last step should be to use a brake cleaner. The advantage here is that it evaporates without leaving any residue.
At the Regrowth the chain then driven is all this is no longer necessary.
Of course, please don't put any more oil on it afterwards, otherwise the whole process would start all over again.
By the way: All liquids that are produced in this way are a case for the recycling center!
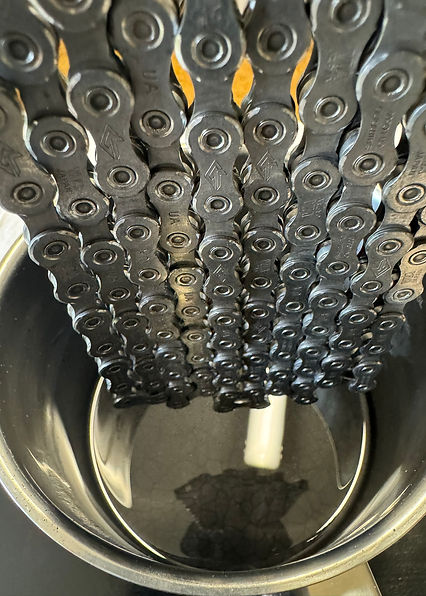

Step 2: Place the chain in the wax bath
Now you dip the sparkling clean and grease-free chain into the hot wax. Melting and then bathing the chain in the wax can either be done in a simple saucepan, although you shouldn't go over 100 degrees. Or you can use a slow cooker, which can partly maintain the temperature on its own.
Your FairWax hot wax is now melted and heated to around 90 degrees (be careful not to exceed 100 degrees) and becomes nice and thin. This means it can then penetrate perfectly into the inside of the chain. To ensure that the important additives adhere, it is recommended that you stir the wax bath beforehand and stir the chain, which is threaded onto a wire, through the wax.
It is best to use gloves as the wax is quite hot now.
Now it is a good idea to turn off the stove / slow cooker in order to use a trick to find the right moment when the chain should be taken out of the wax bath.
Wait until a skin has formed on the wax. Then the wax and the chain are usually at the right temperature to be removed.
(5-15min)
If the wax and the chain are still too hot at this moment, too much wax will run out of the chain, which will severely impair the lubricating performance.
After draining, you can hang them over the pot or slow cooker to cool.
If more than a few drops run back from the chain into the pot when you lift the chain out, the temperature in the pot is too high and the process must be repeated with an adjusted temperature.
Finally , the remaining wax hardens into a large lump and can then be reused again and again.
A simple saucepan or a slow cooker both do a good job here, although the slow cooker can make it easier to maintain the temperature. One packet of FairWax hot wax is usually enough for 15 chains or more if you do it right and let the chains drip over the bath.
If you don't care much about deep cleaning the used chains and always just re-wax them with hot wax, the wax should be replaced sooner.
Step 3: Make the chain flexible again
When the chain is cold again (1.5-2 hours), don't be surprised, it is now as stiff as a board. You can now break it back in over a piece of wood, plastic pipe or something similar and make it move again so that you can mount it on the bike.
(not sideways)
The chain must not be broken too early.
The final running-in, however, only takes place on the bike. Usually a few kilometers and a few shifts through all the gears are enough and the chain is ready for use.
If you have a race coming up or your neighbor is challenging you, you should plan on 50 km of running-in time for optimal performance.
Depending on the gear group, the gears can rattle a bit, especially at the rear, but this quickly goes away. If the gears were previously correctly adjusted, just don't adjust them. After 20-50 km, every chain is definitely as it should be after growing.
There will now be a few flakes of wax on the chain stays, you can simply wipe these off, this is all completely normal and harmless. Over time, these will fall off on their own.
Equipment for growing the chain:
Makes it easier:
These accessories make it even more professional – for the last watt and best performance of wax:
If the process is too demanding for you, you can request finished chains from us and have them re-waxed later.
*This is only intended as a help and not as a binding guide. We exclude any claims against us. No claim to completeness.
Please fill out the following form to declare your withdrawal from the contract.
